
1.NEXWAY-S, MAXIEZ-CZ series machine room elevators
Applicable UCMP models: BK6P5SR, BK016SR, BK025S, BKF011MB, BKF020MB
1.1 Detection circuit confirmation process
(1) Stop the cAr at the top floor.
(2) Switch the mode to HAND mode through the MSB (machine room switch box).
(3) Turn off the power of the MCB and turn off the circuit breaker ELD.
(4) Use temporary test wiring to change the connection between the control cabinet and the re-leveling sensor.
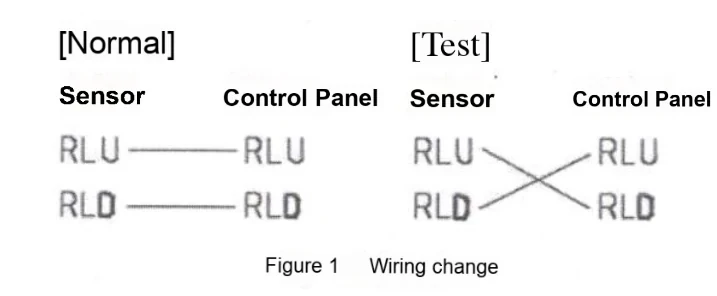
(5) Turn on the power through MCB
(6) Switch the mode to AUTO (brake) (normal) mode through MSB.
(7) Move the car to any floor except the test floor through AUTO (automatic) operation.
(8) Move the car to the test floor through AUTO (automatic) (high speed) operation.
(9) Set the SET function SET1/0-0/4 in A mode (speed 4m/min) through the PCB on the control panel.
1) Set the rotary switches SET1 and SETO on the PCB on the control panel to "SETI=0" and "SETO=8", and press the SW1 switch (set the SET function in A mode).
2) Set the rotary switches SET1 and SETO to "SET1=0" and "SETO=4", and press the SW1 switch (set SET1/0=0/4 in A mode).
(10) Switch the mode to HAND (manual) mode through MSB.
(11) Close the door manually.
(12) Manually move the car to a position between 10 mm and 75 mm above the floor.
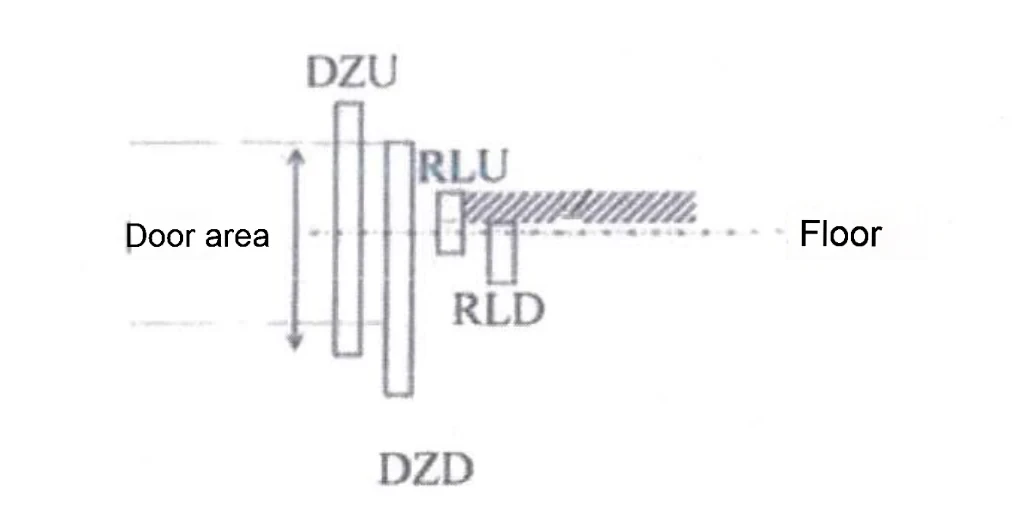
(13) Use the triangular key to open the door at the test floor and keep it open.
(14) Switch the mode to AUTO mode via MSB.
Note: The car starts to move upward and performs leveling operation (one or several times) and stops outside the leveling area.
(15) Close the door after the car stops.
(16) Confirm that the car cannot be restarted when any of the following error codes are detected.
Error code of VFGLC: "80B (SW_UMD_DETECT)" [SET1/0=0/8 and MON1/0=1/0]
Error code of VFGL: "E7A (SW_UMDOFF)" [MON1/0=1/7]
(17) Switch the mode to HAND mode via MSB.
(18) Turn the power off and then on via MCB.
(19) Switch the mode to AUTO mode via MSB.
(20) Move the car to any floor except the test floor by AUTO operation.
(21) Move the car to the test floor by AUTO (automatic) (high speed) operation.
(22) Set the SET function SET1/0=0/4 in A mode (speed 4m/min) by PCB on the control panel.
1) Set the rotary switches SET1 and SETO on the PCB on the control panel to "SET1=0" and "SETO=8", and press the SW1 switch (set the SET function in A mode).
2) Set the rotary switches SETI and SETO to "SETI=0" and "SETO=4", and press the SW1 switch (set SET1/0=0/4 in A mode).
(23) Switch the mode to HAND mode by MSB.
(24) Close the door manually.
(25) Move the car to a position between 10mm and 75mm below the floor surface by manual operation.
(26) Use the triangular key to open the landing door at the test floor and keep it open.
(27) Switch the mode to AUTO mode via MSB.
Note: The car starts to move downward for leveling operation (one or several times) and stops outside the leveling area.
(28) Close the door after the car stops.
(29) Confirm that the car cannot be restarted when any of the following error codes are detected.
Error code of VFGLC: "80B (SW_UMD_DETECT)" [SET1/0=0/8 and MON1/0=1/0]
Error code of VFGL: "E7A (SW_UMDOFF)" [MON1/0=1/7]
(30) Switch the mode to HAND mode via MSB.
(31) Turn the power off and then on via MCB.
(32) Repeat the process from (6) to (31) for each floor.
(33) Restore the elevator operation (replace the wiring of the re-leveling sensor and open the circuit breaker ELD).
1.2 Braking torque confirmation
1.2.1 Measurement procedure
(1) The car stops at the highest floor.
(2) Confirm that the car is unloaded.
(3) Switch the mode to HAND mode through the MSB (machine room switch box).
(4) Set the SET function SET1/0=0/8 (standard setting) through the PCB on the control panel. Set the rotary switches SET1 and SETO on the PCB on the control panel to "SETI=0" and "SETO=8", and press the SW1 switch (standard setting).
(5) Set the MON function MON1/0=0/5 (UCMP confirmation) through the PCB on the control panel.
Set the rotary switches MON1 and MONO on the PCB on the control panel to "MON1=0" and "MONO=5" (set MON1/0=0/5).
(6) Move the car downward from the highest floor by more than 600mm through the HAND mode.
(7) Switch the mode to AUTO mode through the MSB.
(8) The car automatically moves to the highest floor at a low speed and then stops immediately at the door area.
(9) Wait for more than 10 seconds and the car door will open.
(10) Switch the mode to HAND mode via MSB.
(11) Measure the distance from the landing side to the car (As shown below).
(12) Repeat operations (6) to (11) 5 times.
(13) Use the PCB in the control panel to set the MON function MON1/0 = 0/8 (normal).
(14) Switch the mode to AUTO mode via MSB.
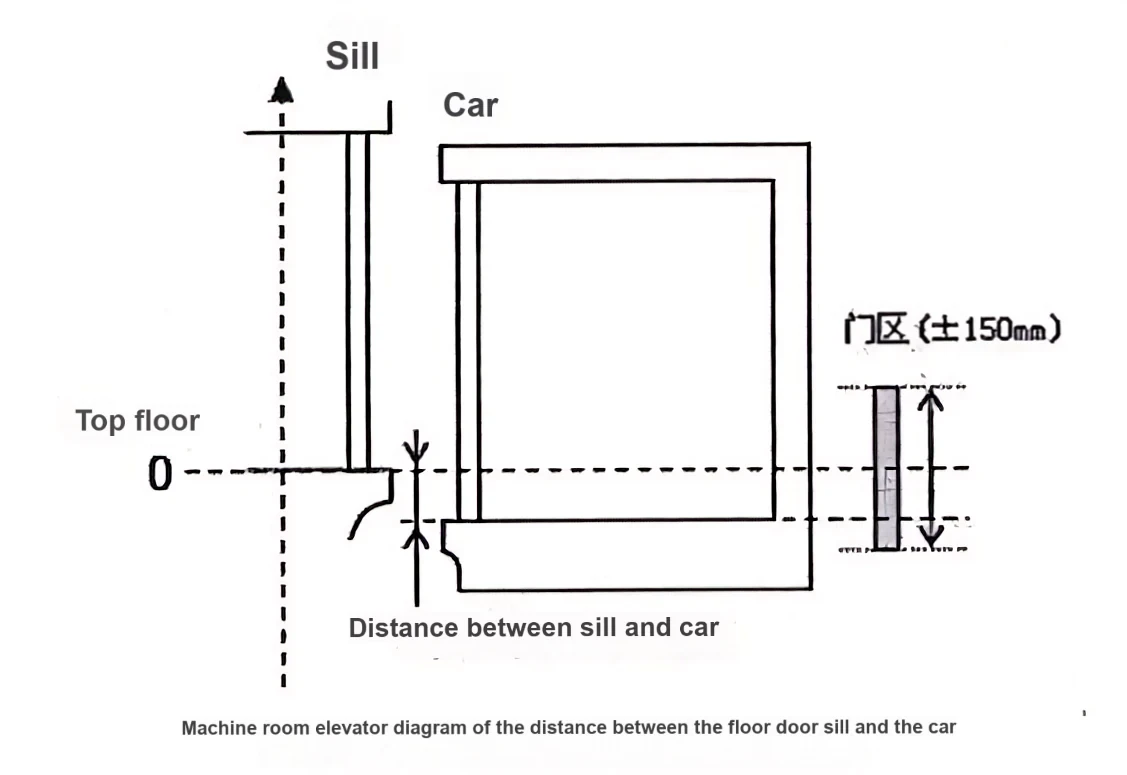
1.2.2 Braking torque confirmation method
Calculate the average of the braking distances measured 5 times and confirm that it is less than the corresponding braking distance value in Table 5 according to the UCMP model; otherwise, it means that the braking force is insufficient and repair and maintenance should be carried out until the test meets the requirements again.
| Table 1 NEXWAY-S, MAXIEZ-CZ series machine room elevator stopping distance | ||||||||
| Traction model | UCMP mode | Testing agency | Test speed for final inspection (m/s) | Corresponding stopping distance value (m) | ||||
| PM3P7SR/PM6P5SR | BK6P5SR | ETC | 0.3 | 0.5 | ||||
| PM011SR/PM016SR | BK016SR | NETEC | 0.3 | 0.26 | ||||
| PM015S/PM021S | BK025S | NETEC | 0.3 | 0.34 | ||||
| PMF011MB/PMF016MB | BKF011MB | ETC | 0.3 | 0.5 | ||||
| PMF020MB/PMF027MB | BKF020MB | ETC | 0.25 or 0.33 | 0.145 | ||||
2.ELENESSA, MAXIEZ-LZ series machine room-less elevators
Applicable UCMP models: BKF6P5S, BKF011S, BKF018S
2.1 Detection circuit confirmation process
(1) Stop the car at the top floor.
(2) Change the mode to ED mode through HIP/ETP (floor station operation panel).
(3) Use HIP/ETP to lower the car to a position where it can go to the top of the car.
(4) Turn off the power of HIP/ETP.
(5) Open the door of the highest floor and go to the top of the car.
(6) Open the control cabinet.
(7) Use temporary test wiring to change the connection between the control cabinet and the re-leveling sensor.
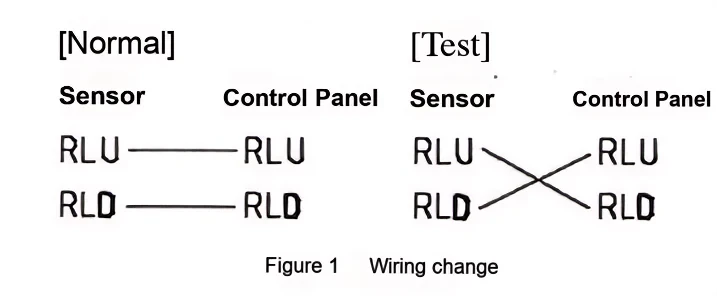
(8) Close the control cabinet.
(9) Leave the top of the car, go to the landing side, and close the landing door.
(10) Turn on the HIP/ETP power.
(11) Switch the mode to NORMAL mode on the HIP/ETP.
(12) Move the car to any floor other than the test floor by NORMAL operation.
(13) Move the car to the test floor by NORMAL (high speed) operation.
(14) Set the SET function 1/0 = 0/4 in A mode (speed 4m/min) by using the PCB on the car operating panel or the infrared controller.
<For PCB on the car operating panel>
1) Set the rotary switches SET1 and SETO on the PCB board on the car operating panel to "SETI = 0" and "SETO = 8" respectively, and press the SW1 switch (set the SET function in A mode).
2) Set the rotary switches SET1 and SETO to "SETI = 0" and "SETO = 4" respectively, and press the SW1 switch (set SET1/0 = 0/4 in A mode).
<For infrared remote controller>
1) Press the "START", "7", "8" and "OK" buttons on the remote controller (HIP/ETP display mode).
2) Press the "START", "0" (SET1), "8" (SETO) and "OK" buttons (set SET1/0 = 0/4 in A mode).
(15) Switch the car mode to ED (Emergency Electric Operation) mode through HIP/ETP.
(16) Close the door manually.
(17) Move the car to a position between 10 mm and 75 mm above the floor through ED (Emergency Electric Operation) operation.
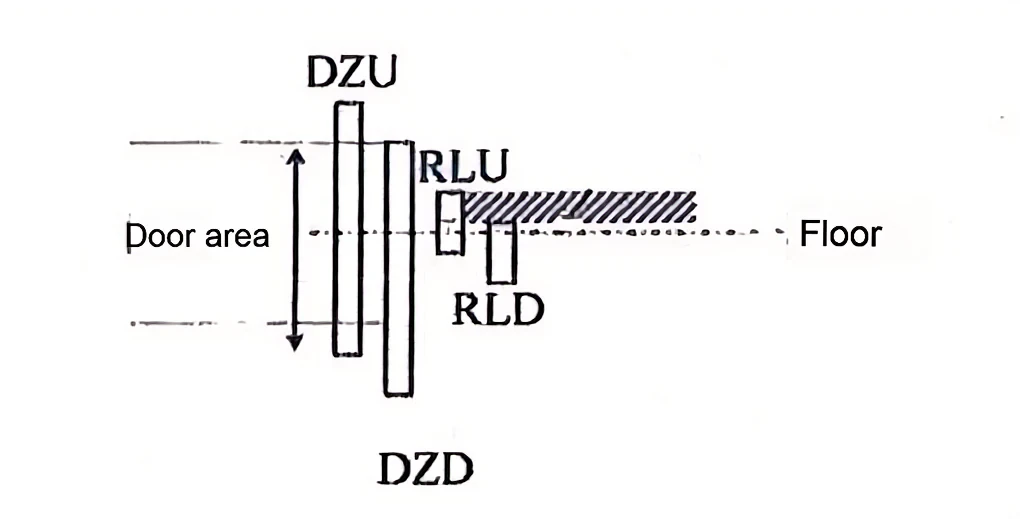
(18) Use the triangular key to open the door at the test floor and keep it open.
(19) Switch the mode to NORMAL mode via HIP/ETP.
Note: The car will start to move upward for leveling operation (one or several times) and stop outside the leveling area.
(20) Close the door after the car stops.
(21) Confirm that the car cannot be restarted when any of the following error codes are detected.
Error code: "80B (SW_UMD_DETECT)" [SET1/0=0/8 and MON1/0=1/0]
(22) Switch the mode to ED (Emergency Electric Operation) mode via HIP/ETP.
(23) Turn the power off and then on via HIP/ETP.
(24) Switch the mode to NORMAL mode via HIP/ETP.
(25) Move the car to any floor other than the test floor via NORMAL operation.
(26) Move the car to the test floor by NORMAL (high speed) operation.
(27) Set SET function 1/0 = 0/4 in A mode (speed 4m/min) by using the PCB or infrared controller on the car operation panel.
(28) Switch the car mode to ED (emergency electric operation) mode by HIP/ETP.
(29) Close the door manually.
(30) Move the car to a position between 10mm and 75mm below the floor by ED (emergency electric operation) operation.
(31) Use the triangular key to open the door at the test floor and keep it open.
(32) Switch the mode to NORMAL mode via HIP/ETP.
Note: The car will start to move down for leveling operation (one or several times) and stop outside the leveling area.
(33) Close the door after the car stops.
(34) Confirm that the car cannot be restarted when any of the following error codes are detected.
Error code: "80B (SW_UMD_DETECT)" [SET1/0=0/8 and MON1/0=1/0]
(35) Switch the mode to ED (Emergency Electric Operation) mode via HIP/ETP.
(36) Turn the power off and then on via HIP/ETP.
(37) Repeat the process from (11) to (36) for each floor.
(38) Restore the elevator (replace the wiring of the re-leveling sensor).
2.2 Braking torque confirmation
2.2.1 Measurement procedure
(1) The car stops at the highest floor.
(2) Confirm that the car is unloaded.
(3) Switch the mode to ED (Emergency Electric Operation) mode through HIP/ETP.
(4) Use the PCB on the car control panel to set SET1/0=0/8 (standard setting).
For the PCB on the car control panel:
1) Set the rotary switches SET1 and SETO on the PCB on the car operating panel to "SETI=0" and "SETO=8", and press the SW1 switch (standard setting).
(5) Use the PCB on the car control panel to set the MON function to MON1/0=0/5 (UCMP confirmation).
For the PCB on the car control panel:
1) Set the rotary switches MON1 and MONO on the PCB on the car operating panel to "MON1=0" and "MONO=5" (set MON1/0=0/5).
(6) Move the car down more than 600mm from the highest floor through ED (Emergency Electric Operation) operation.
(7) Switch the mode to NORMAL mode through HIP/ETP.
(8) The car automatically moves to the highest floor at a low speed (0.25m/s) and then stops immediately at the door area (-150mm).
(9) Wait for more than 10 seconds and the car door will open.
(10) Switch the mode to ED (Emergency Electric Operation) mode through HIP/ETP.
(11) Measure the distance from the landing side to the car (As shown below).
(12) Repeat (6) to (11) 5 times.
(13) Use the PCB on the car operating panel to set the MON function MON1/0 = 0/8.
(14) Switch the mode to NORMAL mode through HIP/ETP.
2.2.2 Braking torque confirmation method
Calculate the average value of 5 measurements and confirm that the average value is lower than the value listed in Table.
*A negative value indicates that the car is below the floor.
*Confirm the car weight by the contract formula. When the car weight changes, the change in weight should be considered. (Use the changed car weight value)
*Confirm that the measurement result is the value shown below
『Average value of measurement』 ≤ 『Judgment value in the table』
*When the average value of the measured value does not meet the above formula, please confirm the static braking torque and dynamic braking torque.
| Brake type | Braking capacity [kg] | Car weight[kg] | |||||||||||||||||||||
| 680-799 | 800-899 | 900-999 | 3000-1099 | 1100-1199 | 1200-1300 | ||||||||||||||||||
| BKF6P5S | 450-630 | -81 | -78 | -76 | -73 | -70 | -68 | ||||||||||||||||
| Brake type | Braking capacity [kg] | Car weight[kg] | |||||||||||||||||||||
| 800-899 | 900-1149 | 1150-1399 | 1400-1599 | 1600-1799 | 1800-2000 | ||||||||||||||||||
| BKF011S | 630-824 | -22 | -25 | -28 | -30 | -32 | -34 | ||||||||||||||||
| 825-1049 | 一 | -19 | -22 | -25 | -27 | -29 | |||||||||||||||||
| 1050 | -17 | -19 | 22 | -24 | |||||||||||||||||||
| Brake type | Braking capacity [kg] | Car weight[kg] | |||||||||||||||
| 1140-1899 | 1900-2599 | 2600-3100 | |||||||||||||||
| BKFO18S | 1050-1600 | -42 | -44 | -46 | |||||||||||||
| Brake type | Braking capacity [kg] | Car weight[kg] | |||||||||||||||||||||
| 1850-2149 | 2150-2449 | 2450-2749 | 2750-3049 | 3050-3349 | 3350-3649 | 3650-3949 | 3950-4249 | 4250-4560 | |||||||||||||||
| BKF020MB | 1600-2399 | -95 | -92 | -89 | -86 | -83 | -81 | -78 | -75 | -72 | |||||||||||||
| 2400-2729 | -92 | -89 | -86 | -83 | -80 | -77 | -74 | -71 | -68 | ||||||||||||||
| 2730 | -87 | -84 | -81 | -78 | -74 | -71 | -68 | -65 | -62 | ||||||||||||||
Distance unit: mm


