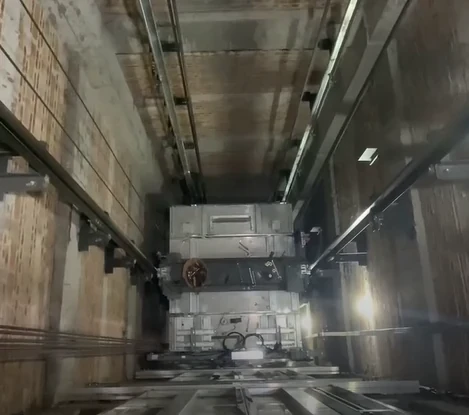
The guide rail system is one of the most important mechanical systems inside an elevator shaft.
While the traction machine provides the Lifting force and the elevator controller manages operation, the elevator guide rails determine how the car and counterweight travel vertically through the shaft.
If the guide rails are installed incorrectly, the elevator may develop:
- Car vibration
- Abnormal running noise
- Uneven ride quality
- Guide shoe wear
- Increased mechanical resistance
- Abnormal contact between the guide shoe and rail
- Problems during leveling
- Increased load on mechanical components
- Difficulty during final commissioning
For this reason, guide rail installation should not be treated simply as "fixing rails to the shaft wall." It is a precision installation process involving guide rail brackets, rail alignment, rail joints, clearances and final inspection.
The supplied technical reference places guide rail assembly after the traction-system installation stage and provides specific inspection requirements for rail straightness, flatness, relative deviation, joint treatment and bracket installation.

1. What Are Elevator Guide Rails?
Elevator guide rails are vertical steel rails installed inside the hoistway.
Their primary purpose is to guide:
- The elevator car
- The counterweight
during vertical movement.
The car and counterweight each have their own guide system, and the corresponding elevator guide shoe runs along the guide rail.
A simplified relationship is:
Guide rail → guide shoe → car/counterweight → controlled vertical movement
The guide rail therefore directly affects the stability and smoothness of elevator travel.
2. Main Components of an Elevator Guide Rail System
A typical guide rail system contains several major components.
2.1 Elevator Guide Rail
The guide rail is the main vertical guiding component.
Its:
- Model
- Specification
- Length
- Straightness
- Surface condition
- Joint condition
must be checked before installation.
The reference document specifically states that the guide rail model and specification should comply with the design requirements.
2.2 Elevator Guide Rail Brackets
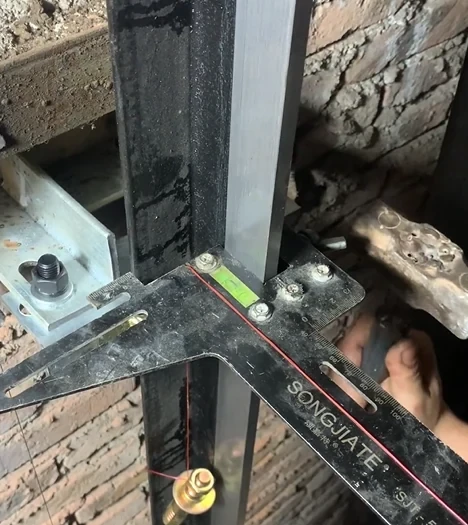
Guide rail brackets connect the rails to the elevator shaft structure.
A properly installed bracket should be:
- Firmly fixed
- Correctly positioned
- Properly aligned
- Horizontally level
- Capable of maintaining rail position during operation
A poor bracket installation can cause the guide rail to shift or become misaligned.
2.3 Elevator Guide Shoe
The guide shoe connects the moving elevator equipment to the stationary guide rail.
Depending on the elevator design, the guide shoe may use:
- Sliding elements
- Rollers
- Other manufacturer-specific guiding arrangements
The guide shoe must move correctly along the guide rail without excessive friction or abnormal pressure.
This is why guide rail alignment and guide shoe adjustment cannot be considered separately.
3. Preparing for Elevator Guide Rail Installation
Before installing the rails, technicians should verify the shaft conditions.
Important items include:
- Shaft dimensions
- Shaft verticality
- Bracket fixing locations
- Rail installation reference lines
- Wall strength
- Embedded components
- Required clearances
- Car and counterweight positions
- Buffer and pit conditions
The supplied document specifies that the shaft wall should have sufficient structural strength and gives a concrete strength reference of 24 MPa for the shaft wall in its installation-condition section.
This value belongs to the supplied reference document and should not be treated as a universal current code requirement.
For an actual project, the latest applicable building and elevator standards must be followed.
4. Check the Guide Rail Before Installation
Before lifting a rail into the shaft, inspect every rail.
Check the rail body
Look for:
- Bending
- Deformation
- Rust
- Damage
- Surface defects
- Contamination
Check rail dimensions
Confirm that:
- Rail type matches the design
- Rail specification is correct
- Rail length is correct
- Accessories are compatible
Check straightness
The supplied reference document requires inspection of the straightness and flatness of each T-type guide rail. It specifies that the flatness on the guiding side should be less than 1/2 mm, with a full-length deviation of less than 0.7 mm in the referenced installation requirements.
These values should be treated as requirements from the supplied reference document, not as universal requirements for every modern elevator system.
5. Installing Elevator Guide Rail Brackets
The guide rail bracket is the foundation of the rail installation.
If the bracket position is wrong, later rail adjustment can become extremely difficult.
Recommended sequence
Step 1: Mark the bracket positions.
Step 2: Check the shaft wall and fixing points.
Step 3: Install the approved fixing hardware.
Step 4: Position the bracket.
Step 5: Check horizontal alignment.
Step 6: Secure the bracket.
Step 7: Recheck the position before installing the rail.
The supplied reference specifically requires guide rail brackets to be firmly installed, correctly positioned and horizontally aligned.
6. Installing the First Guide Rail
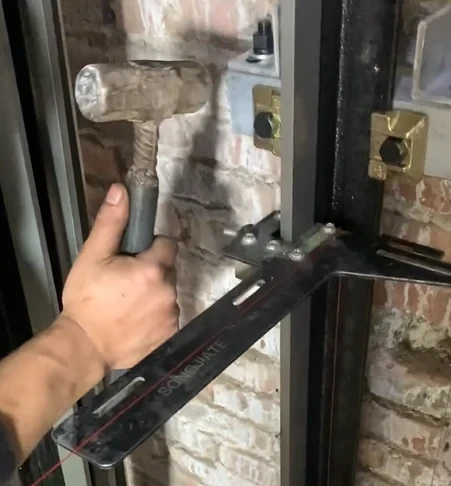
The first rail is especially important because it establishes the reference for subsequent rail installation.
After positioning the rail:
- Secure the rail temporarily.
- Check its vertical position.
- Check its relationship with the shaft reference line.
- Check the bracket connection.
- Perform alignment.
- Tighten the fixing components.
- Recheck after tightening.
Do not assume that a rail is correctly aligned simply because the bracket has been tightened.
Tightening the bracket does not automatically mean the rail is correctly aligned.
7. Elevator Guide Rail Alignment
Guide rail alignment is one of the most important steps in the entire installation process.
The reference document provides several alignment requirements.
It states that the relative deviation between the two guide rails over the full height should be no more than 1 mm. It also gives separate referenced values for the inside-surface relationship of the car and counterweight guide rails.
The document also specifies a verticality inspection based on a 5 m section, with a referenced deviation of 0.7 mm.
These values are useful when explaining the precision expected during installation, but the actual project specification and manufacturer's installation manual should always take priority.
8. Why Guide Rail Alignment Matters
Incorrect guide rail alignment can affect the entire elevator system.
For example:
Poor rail alignment
↓
Uneven guide shoe contact
↓
Increased mechanical resistance
↓
Vibration and noise
↓
Increased component wear
This relationship is particularly important because a technician may initially diagnose the problem as a guide shoe problem when the underlying cause is actually guide rail alignment.
The same principle applies during maintenance.
If a guide shoe shows unusual wear, do not immediately replace the guide shoe without checking the rail and its alignment.
9. Guide Rail Joint Installation
Elevator guide rails are normally installed in sections, so the joints between rails require careful attention.
A poor guide rail joint can create:
- A mechanical step
- Increased guide shoe impact
- Running noise
- Vibration
- Accelerated guide shoe wear
The supplied reference document specifies that the guide rail joint gap should be controlled and permits a limited step at the joint. It also references a rail finishing length of approximately 250–300 mm for joint treatment.
10. How to Check an Elevator Guide Rail Joint
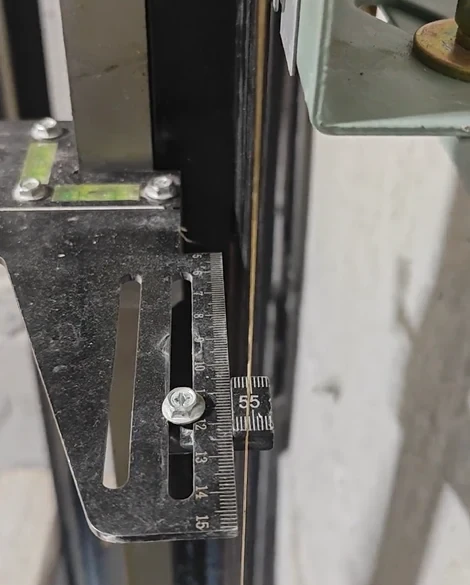
After connecting two rails, check:
1. Joint position
Make sure the joint is correctly supported.
2. Joint gap
Check the gap according to the manufacturer's requirements.
3. Rail surface transition
Run a suitable inspection tool across the joint.
4. Step or misalignment
Check for any raised or offset surface.
5. Fasteners
Confirm all required fixing hardware is correctly installed.
6. Rail finish
If the installation specification requires rail finishing at the joint, complete it according to the manufacturer's procedure.
The goal is to create a smooth transition between adjacent rails.
11. Guide Rail Joint Step and Surface Finishing
A small rail-joint step can become important because the guide shoe repeatedly passes over the same location.
If the transition is not properly finished, the guide shoe may experience repeated impact.
This can lead to:
- Noise
- Vibration
- Localized wear
- Increased maintenance frequency
The supplied reference material allows a limited joint step and specifies a finishing length of approximately 250–300 mm.
Again, the actual permitted values should be checked against the specific elevator manufacturer's installation instructions.
12. Guide Rail Alignment and Guide Shoe Adjustment
After the rails are installed, the guide shoes must be checked in relation to the rails.
The guide shoe should not be:
- Excessively tight
- Loose
- Misaligned
- Damaged
- Forced against the rail
A correctly aligned rail helps the guide shoe operate with stable contact.
The supplied door-system troubleshooting material provides a useful example of the same mechanical principle: excessive contact between a roller and guide rail can create excessive running resistance, and mechanical adjustment should be checked before assuming an electronic fault.
Although that example concerns a door system rather than the main elevator guide rails, it illustrates an important maintenance principle:
Mechanical alignment should be checked before changing electrical parameters.
13. Guide Rail Installation at the Counterweight
The counterweight also requires a properly aligned guide rail system.
The counterweight rails should be checked for:
- Correct position
- Vertical alignment
- Relative spacing
- Joint condition
- Bracket strength
- Guide shoe contact
The reference document includes specific counterweight-related guide rail dimensions and clearances as part of its guide rail installation requirements.
Because counterweight geometry varies between elevator models, technicians should use the specific installation drawing rather than applying one dimension to every elevator.
14. Guide Rail Clearance and Car/Counterweight Movement
Guide rail installation must also account for the complete travel of:
- Elevator car
- Counterweight
- Guide shoes
- Safety gear
- Other moving components
The supplied document states that when the counterweight or car compresses its buffer completely, the guide rail length must still provide the required additional travel allowance. It gives a formula involving elevator rated speed in its referenced installation requirements.
This is an important installation check because guide rail positioning cannot be considered only at the normal operating position.
The extreme travel positions must also be considered.
15. Guide Rail Installation Quality Checklist
Before moving to final commissioning, inspect the complete guide rail system.
Guide Rail
- Correct rail model
- Correct rail specification
- No significant deformation
- Rail surface is clean
- Straightness checked
- Flatness checked
- Rail alignment checked
Guide Rail Brackets
- Correct bracket type
- Correct installation position
- Firmly fixed
- Horizontally aligned
- No obvious deformation
Rail Joints
- Joint correctly positioned
- Joint gap checked
- Joint step checked
- Surface transition finished where required
- Fasteners checked
Car Guide System
- Guide shoes correctly installed
- Guide shoe movement checked
- No abnormal friction
- No abnormal noise
Counterweight Guide System
- Counterweight rails correctly positioned
- Guide shoes checked
- Full travel checked
- Clearances verified
16. Common Elevator Guide Rail Problems
| Problem | Possible Cause | Recommended Inspection |
|---|---|---|
| Elevator vibration | Guide rail misalignment | Check verticality and rail relationship |
| Running noise | Rail joint step | Inspect and finish rail joint |
| Guide shoe wear | Excessive or uneven contact | Check guide rail and guide shoe |
| Car movement resistance | Rail/guide shoe interference | Check alignment and clearances |
| Counterweight noise | Counterweight guide rail issue | Check rail alignment and joints |
| Repeated local vibration | Rail joint problem | Inspect the same position during travel |
| Bracket movement | Incorrect fixing | Check bracket installation |
| Rail cannot be aligned | Incorrect bracket position | Recheck shaft reference and bracket location |
17. How to Troubleshoot Elevator Guide Rail Problems
A systematic troubleshooting method is more effective than replacing components randomly.
Step 1 — Identify when the problem occurs
Ask:
- Does it happen during upward travel?
- During downward travel?
- At high speed?
- At low speed?
- Near a particular floor?
- At the same shaft position every time?
If the problem occurs at the same physical shaft position, inspect the corresponding rail section and joint first.
Step 2 — Check guide rail joints
Look for:
- Joint steps
- Loose fasteners
- Incorrect gap
- Surface damage
- Misalignment
Step 3 — Check guide shoe condition
Inspect:
- Wear
- Damage
- Abnormal contact
- Lubrication requirements where applicable
- Correct installation
Step 4 — Check the brackets
A rail may initially be correctly aligned but later move because of a loose or incorrectly installed bracket.
Step 5 — Check full-height alignment
If the problem appears throughout the shaft, inspect the overall rail alignment rather than focusing on one joint.
18. Elevator Guide Rail Installation Tools
Professional installation requires accurate measurement.
Useful elevator testing tools and installation tools may include:
- Measuring tape
- Steel ruler
- Spirit level
- Plumb line
- Alignment tools
- Feeler gauges
- Torque tools
- Rail-joint inspection tools
- Manufacturer-specific installation tools
The supplied installation reference emphasizes measurement of rail straightness, verticality and clearances, so visual inspection alone is not sufficient for final acceptance.
19. Safety During Guide Rail Installation
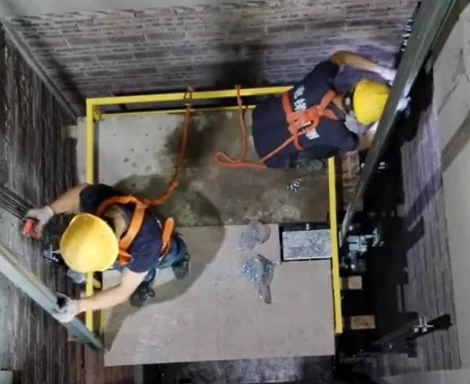
Guide rail installation normally involves working inside an elevator shaft, often at height and around heavy steel components.
Safety must therefore be addressed before technical work begins.
The supplied safety manual requires workers to identify fall hazards and use appropriate fall protection where required.
When equipment does not need to be energized, the manual requires the equipment to be placed in a zero-energy state and locked/tagged, with verification using an appropriate meter.
When working with a suspended elevator car or counterweight, the safety reference requires at least two independent securing methods, with each method capable of independently supporting the load.
This is especially important during guide rail installation or work around the car and counterweight.
20. Guide Rail Inspection Before Elevator Commissioning
The supplied installation procedure places guide rail inspection within the elevator installation acceptance process.
Before commissioning, the technician should confirm:
Mechanical
- Rail model and specification
- Rail straightness
- Rail alignment
- Rail verticality
- Rail-joint condition
- Bracket installation
- Guide shoe condition
- Car and counterweight clearances
Functional
Run the elevator at an appropriate commissioning speed and observe:
- Vibration
- Noise
- Guide shoe behavior
- Car movement
- Counterweight movement
- Leveling behavior
The supplied reference document also describes final testing and inspection as part of the elevator installation acceptance process.
21. Relationship Between Guide Rails and Other Elevator Components
An elevator is an integrated mechanical system.
The guide rail system works together with:
Guide rails
↓
Guide shoes
↓
Car frame / counterweight frame
↓
Safety gear and other mechanical components
↓
Traction system
↓
Controller and drive system
A problem in one area can therefore affect another.
For example:
Guide rail misalignment
→ increased guide shoe resistance
→ increased mechanical load
→ abnormal vibration/noise
→ poor ride quality
Therefore, professional elevator troubleshooting should always consider the entire mechanical system.
22. Elevator Guide Rails as Elevator Spare Parts
Guide rails are also important elevator spare parts during modernization and repair projects.
Depending on the application, customers may need:
- Elevator guide rails
- Guide rail brackets
- Guide shoes
- Guide shoe inserts
- Rail fasteners
- Rail joint components
- Safety gear components
- Counterweight guide components
When sourcing lift spare parts, technicians should provide the supplier with accurate information.
Recommended information includes:
- Elevator manufacturer
- Elevator model
- Guide rail model
- Rail dimensions
- Rail length
- Car or counterweight application
- Existing component photos
- Required quantity
- Project location
This helps an elevator parts supplier identify the correct replacement component.
23. How to Choose an Elevator Parts Supplier
For maintenance companies, the ability to obtain the correct part quickly is important.
A professional elevator parts supplier should ideally be able to provide:
- Correct part-number identification
- Technical support
- Product specifications
- Replacement-part compatibility information
- Installation guidance
- Troubleshooting support
- Repair services for selected electronic components
For example, when ordering an elevator guide shoe, the technician should not only ask for "a guide shoe."
The supplier should know:
Which elevator?
Which model?
Which guide rail?
Which car or counterweight application?
Which guide shoe specification?
The same principle applies to elevator door lock, elevator boards, door operators, buttons and other components.
24. Recommended Maintenance Inspection
Guide rail inspection should not end after installation.
During regular maintenance, technicians should pay attention to:
- Rail surface condition
- Joint condition
- Bracket condition
- Guide shoe wear
- Abnormal noise
- Vibration
- Signs of abnormal contact
- Changes in ride quality
If an elevator begins to develop vibration after previously operating smoothly, compare the current condition with earlier maintenance records.
A change in ride quality may provide an early indication of mechanical wear or alignment problems.
25. Elevator Guide Rail Installation Checklist for Technicians
Before Installation
- Confirm rail model
- Confirm rail specification
- Inspect rails
- Check shaft dimensions
- Check bracket locations
- Prepare measurement tools
During Installation
- Install brackets
- Check bracket position
- Install first rail
- Establish reference alignment
- Install remaining rails
- Check rail verticality
- Check rail spacing
- Check rail joints
After Installation
- Check rail straightness
- Check rail flatness
- Check joint transition
- Check bracket tightness
- Check guide shoes
- Check car movement
- Check counterweight movement
- Check full travel
- Record measurements
Before Handover
- Complete installation inspection
- Complete functional testing
- Record abnormal conditions
- Correct mechanical problems
- Verify safety devices
- Complete required documentation
Frequently Asked Questions
What is the purpose of elevator guide rails?
Elevator guide rails provide the fixed vertical path for the car and counterweight. Their alignment directly affects the movement stability and ride quality of the elevator.
What is an elevator guide rail bracket?
An elevator guide rail bracket is the structural fixing component used to connect the guide rail to the elevator shaft structure.
Why is elevator guide rail alignment important?
Incorrect alignment can cause uneven guide shoe contact, vibration, noise, mechanical resistance and premature component wear.
What should I check if an elevator has vibration at one specific shaft position?
First identify the exact physical position where the vibration occurs. Then inspect the corresponding guide rail section, rail joint, bracket and guide shoe.
Can I use the same guide rail for every elevator?
No. Guide rail model, dimensions, strength and installation requirements depend on the elevator design. Always verify the elevator manufacturer's specifications.
Can an elevator guide shoe problem actually be caused by the guide rail?
Yes. A worn or damaged guide shoe may be the symptom of an alignment or rail-joint problem. The guide rail and guide shoe should be inspected together.
What tools are useful for elevator guide rail installation?
Depending on the project, technicians may use measuring tools, levels, plumb/alignment tools, feeler gauges, torque tools and manufacturer-specific elevator testing tools.