
Introduction
The 3300 door operatorused on Fermator VVVF4 elevator systems has a set of common faults and corresponding remedies. Each fault is described with symptoms and probable causes, followed by suggested corrective actions and maintenance advice. The cases below are organized according to the original troubleshooting manual. Citations are provided where the manual describes the issue, cause and solution.
Troubleshooting Cases
1. Bump in closing due to incorrect DIP setting
Symptoms: A bump occurs during the final part of the door‑closing movement when performing auto‑adjustment or in test runs. There is no slow creep before the door closes.
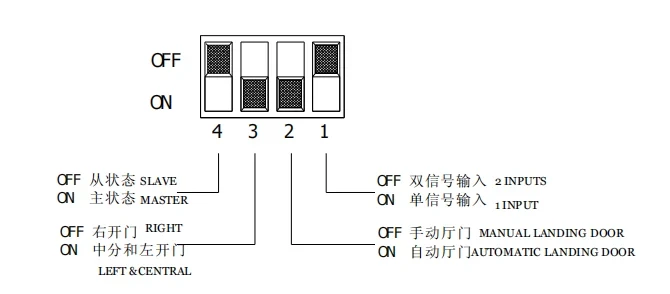
Cause: The door is incorrectly configured as a manual landing door rather than an automatic landing door via DIP switch 2. Automatic doors move 7 mm to open the skate without moving the panels, whereas manual doors have no such movement; if DIP 2 is set incorrectly, the door bumps at the end.
Solutions:
-
Check and correct the DIP‑switch settings. DIP 2 should be ON for an automatic landing door and OFF for a manual landing door. Other DIP switches set master/slave operation, opening direction (left/right/central) and signal inputs.
-
As a preventive measure, Fermator sets the DIP switches for automatic doors before delivery; avoid changing them unless necessary. When adjusting DIP switches, verify each switch’s function and avoid accidentally changing others.
2. Bump in closing due to the pick‑up rollers not positioned
Symptoms: Bumps occur when closing on a particular floor but not on others.
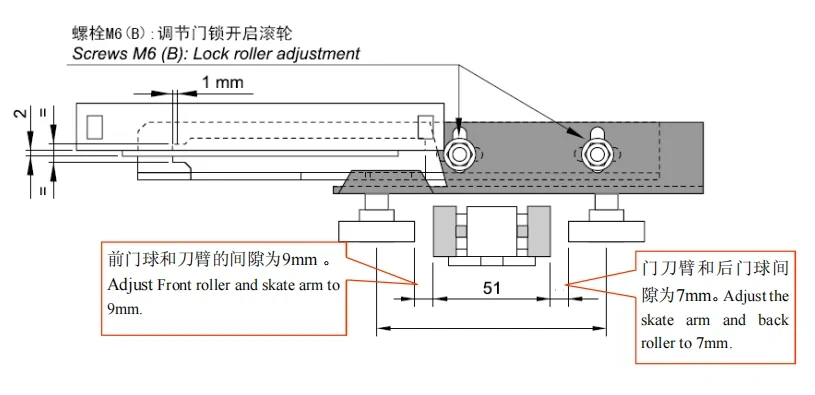
Cause: The distance between the pick‑up back roller and the skate arm is too large; the landing door closes faster than the car door.
Solutions:
-
Adjust the clearances: set the gap between the skate arm and the back roller to 7 mm and the gap between the front roller and the skate arm to 9 mm.
-
Use Fermator’s special adjustment tool for roller regulation to ensure accurate clearances.
3. Bump in closing due to the gap between the panels
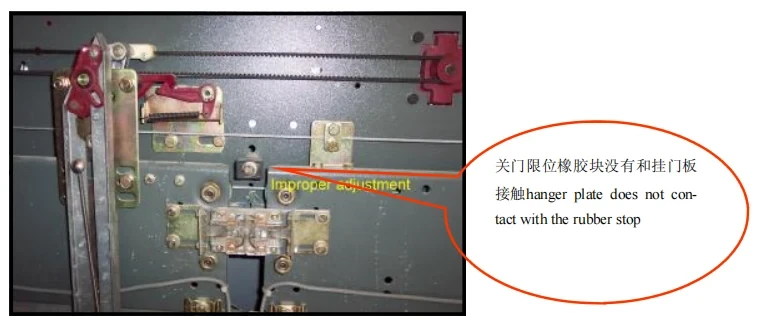
Symptoms: There is a knocking or bumping sound at the end of the door‑closing movement; the rubber stop does not contact the hanger plate. When the gap between panels is uneven, the upper or lower parts of the panels may hit each other.
Cause: The hanger plate is not touching the rubber stop, so the door does not slow down before closing, leaving no gap between panels.
Solutions:
-
Fully close the door so that the hanger plate contacts the rubber stop, then adjust the gap between the panels to 1–2 mm and ensure it is even across the top and bottom; re‑run auto‑adjustment afterwards.
-
When installing doors, ensure the panels are vertical and keep an even gap of 1–2 mm to prevent future issues.
4. Not fully open due to mechanical obstacle
Symptoms: The door fails to fully open due to excessive mechanical resistance. Common sources of resistance include:
-
The eccentric roller pressing tightly against the rail.
-
Excessive friction between the guide shoe and the sill or collisions between them.
-
The close spring tension is too high.
-
The steel cable or belt is too tight.
Solutions:
-
Adjust the eccentric roller so it contacts the rail without friction.
-
Clean the sill and adjust the panels; regulate the guide shoe to run smoothly.
-
Adjust clearances: set the gap between the panel edge and the sill to 5 mm, and reduce the close spring tension by moving its mounting bolt.
-
Adjust belt and steel cord tension; if adjustments do not resolve the problem, contact the service department.
Prevention: Follow the installation manual closely and check door‑operator resistance during installation.
5. Open blockage due to the gap between sill and panel edge
Symptoms: Doors fail to open fully (obstruction indicator LED lights) particularly when many passengers stand at the cabin entrance.
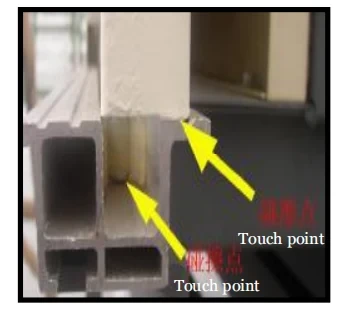
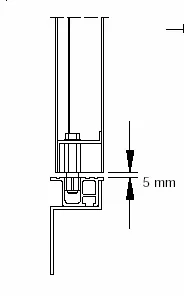
Cause: The gap between the door panel bottom and the landing sill is only 1 mm; when passengers stand on the cabin sill, it deflects slightly, causing the sill to rise and the panel bottom to rub against it.
Solutions:
-
Raise the door panel by adjusting the hanger bolts so that the clearance between the panel and the sill is 5 mm.
Prevention: Follow installation guidelines for proper clearances.
6. Bump in opening due to the skate not fully opened
Symptoms: During opening, the door does not slow down near the limit and bumps when fully open. The system is synchronous, so the belt first travels 7 mm to open the skate before moving the panels.
Cause: The skate does not fully open; the belt’s initial movement is less than 7 mm, so the door reaches the limit while still moving at high speed.
Solutions:
-
Check and adjust the skate mechanism to remove any resistance.
-
Adjust the clearance between the opening roller and the skate arm to 9 mm, slightly greater than the 7 mm clearance at the back roller.
7. Fuse breakdown
Symptoms: Pressing the auto‑adjustment or test button produces no door movement. Controllers are normally “burn‑in” tested (24 hours at 250 V driving two motors) before delivery. If the system is receiving power but the doors do not respond, the fuse has likely blown.
Solutions:
-
Verify that the power switch is on and the OK LED is illuminated.
-
If the OK LED is off, check and replace the external fuse (250 V, 4 A, ceramic type).
-
If the OK LED is on but the doors still do not move, the controller must be serviced.
Prevention: Supply stable power and keep spare fuses on hand.
8. Lift not run due to the interlock not switched
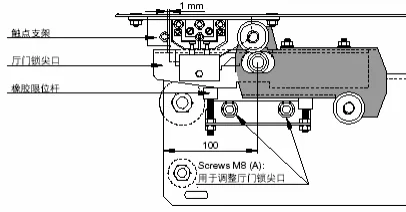
Symptoms:After the doors close, the elevator does not move because the landing interlock is not fully engaged; the safety circuit remains open.
Causes:
-
The gap between the contact bracket and landing lock beak is too small, causing friction and preventing full locking.
-
The pivot pin of the lock’s main support is not moving freely.
Solutions:
-
Adjust the gap between the contact bracket and landing lock beak.
-
Clean and lubricate the main support pin.
Prevention: Read the manual carefully; during routine maintenance (yearly), ensure the pin moves smoothly and apply grease.
9. Auto adjustment failure due to reversed encoder phase
Symptoms: During auto‑adjustment, the doors close slowly, then open slowly but do not close again, indicating auto‑adjustment failure.
Cause: The two central wires of the encoder are reversed, so the controller cannot detect movement properly.
Solutions:
-
Interchange the two middle encoder wires and redo the auto‑adjustment.
Precaution: Never interchange the two outer wires, as this will damage the encoder.
10. Door only runs 26 cm
Symptoms: The door travels only about 26 cm and stops.
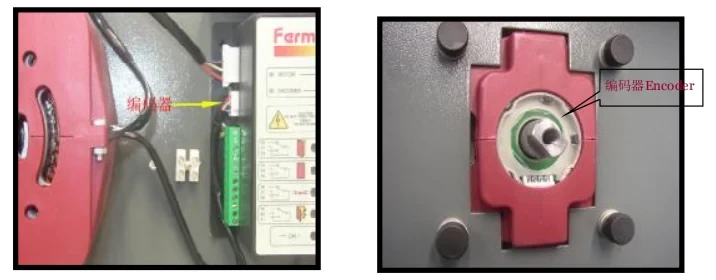
Cause: Encoder feedback data is not reaching the controller, which may result from: (1) loosened or damaged terminal blocks; (2) broken cables; or (3) dust inside the encoder.
Solutions:
-
Check the terminal blocks and repair or replace them.
-
Check cables and replace if broken.
-
Clean the encoder.
-
If the problem persists, contact the service department.
11. Auto adjustment failure due to reversed motor phase
Symptoms: During auto‑adjustment, the door’s first movement is to open and then close, but it remains still afterwards.
Cause: The motor phases are reversed; when power is applied with only the main power and motor wires connected (DIP‑1 set to ON for single‑signal mode), if the door closes first instead of opening, the motor phases are incorrect.
Solutions:
-
Interchange the motor supply phases and perform auto‑adjustment again.
12. Friction noise due to the hanger plate not vertical
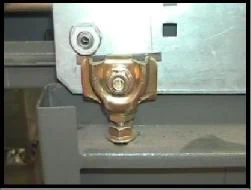
Symptoms: During landing‑door movement there is friction noise caused by the door roller rubbing against the back plate. The hanger plate is tilted because the upper cover panel is bent.
Solutions:
-
Rectify or replace the upper cover panel.
-
Adjust with shims to correct the hanger plate angle.
Prevention: Control fabrication tolerances and maintain a correct bending angle on the cover panel.
13. Noise from close spring friction
Symptoms: Noise occurs during opening or closing due to the landing‑door closing spring. The spring may rub against the contact bracket, hanger plate or door release rod.
Solutions:
-
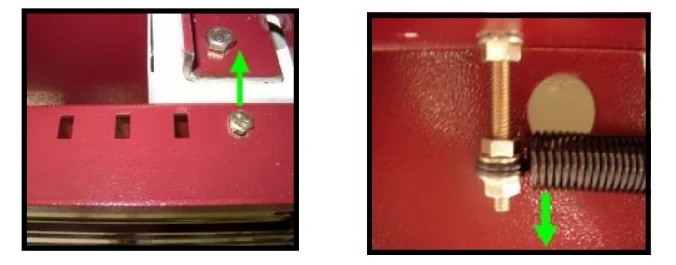
Since the spring terminal is fixed with a bolt, adjust the terminal position to eliminate friction:
-
Move the bolt forward or backward to ensure clearance between the spring and contact bracket.
-
Adjust the bolt up or down to ensure clearance between the spring and hanger plate.
-
-
During maintenance, check the gap between the closing spring and the contact bracket/hanger plate; adjust if necessary.
14. Door went to open during closing due to signal influence
Symptoms: The door unexpectedly opens during closing without an opening signal; the photo‑sensor does not trigger. Voltage measurement between terminal 10 and 12 shows interference (≥12 V). Under the 2 input mode, the open signal has priority; interference results in the door opening during closing.
Cause: The controller’s power supply is not grounded, signal wires and power wires are not separated, and shielded cable is not used. Similar effects occur when the operator is set to master state and the obstruction or photocell signal activates.
Solutions:
-
Properly earth the controller.
-
Route signal wires separately from power wires.
-
Use shielded wires for signal lines.
-
Set the controller to slave mode so movement is controlled only by external open/close signals.
15. Rail greased
Symptoms: Greasing or oiling the door rails causes dust to adhere, increasing resistance and noise. Fermator design specifies that rails should not be lubricated.
Solutions:
-
Clean the rails and door rollers.
Prevention: Follow the manual’s specifications and do not grease or oil the rails.
16. Door rebound after closed
Symptoms: After the doors close, they rebound slightly (1–2 mm).
Cause:
-
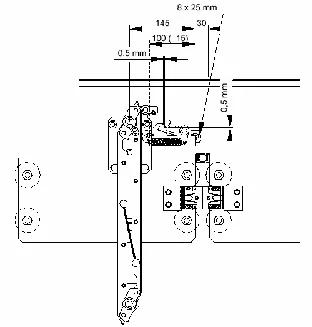
The gap between the two triggers (dragging clamp and security locker) is larger than 0.5 mm.
-
The rubber stop is too soft.
Solutions:
-
Adjust the mounting positions: fix the skate arm, then adjust the moveable trigger so that the gap between the two triggers is ≤ 0.5 mm.
-
Replace the rubber stop and perform auto‑adjustment again.
Prevention:
-
Understand the importance of the trigger‑gap dimension.
-
Ensure the closing signal is not cancelled immediately after door closure; maintaining torque helps prevent rebound.
-
Fermator’s latest controller versions include a closing moment function to mitigate door rebound.
17. Door clashed because the too large distance between the dragging clamp and the security locker
Symptoms: When the door is nearly closed, it accelerates noticeably and may collide, causing a clash. In normal operation, the door should slow down during the final 3–4 cm of travel, and only after fully closing should the skate begin retracting. If the gap between the dragging clamp and the skate trigger is too large, the skate retracts too early, eliminating the low‑speed phase.
Solutions:
-
Adjust the gap so the dragging clamp has only 0.5 mm of free movement relative to the security locker.
Prevention: Follow the manual’s instructions and maintain the correct gap between components.
18. The skate is damaged by clashed with landing sill
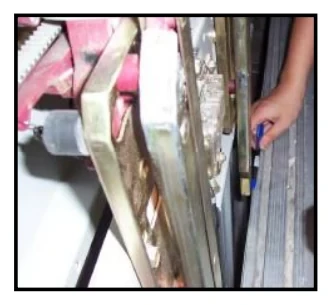
Symptoms: The clearance between the skate and the landing sill is too small, causing the skate to strike the sill when the cabin sways.
Solutions:
-
Adjust the distance from the door operator back board to the cabin front edge to 30 mm, ensuring a clearance of 10 mm between the skate and the landing sill.
Prevention: Study the operating manual and know the key dimensions.
Conclusion
This troubleshooting guide covers common faults in Fermator’s 3300 elevator door operator. By identifying specific symptoms—such as bumps during closing or opening, incomplete opening, abnormal noises or door rebound—the technician can determine the root cause (e.g., incorrect DIP settings, incorrect roller clearances, mechanical resistance, electrical wiring issues). Following the corrective actions and preventive advice outlined here will help maintain smooth, safe and quiet operation of the doors. Always refer to the official manual for detailed procedures and respect the recommended clearances and wiring practices to avoid recurrent faults.


