
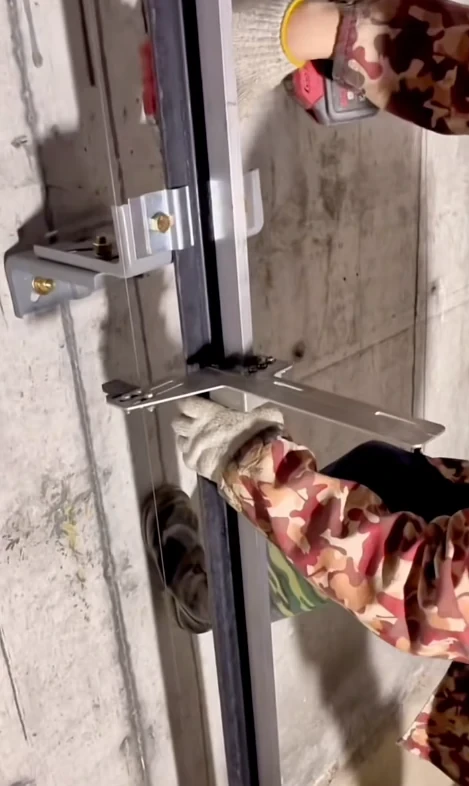
Introduction
elevator installation is a complex process involving mechanical equipment, electrical systems, structural components, safety devices, control systems, and final testing.
A successful elevator installation is not simply a matter of assembling components. The building structure must be suitable for the elevator, the machine room and shaft must meet the required conditions, mechanical components must be correctly aligned, electrical wiring must be properly installed, and all relevant safety devices must be tested before the elevator is placed into normal operation.
The technical material used for this Article emphasizes that elevator safety and reliability are closely related to manufacturing, installation, commissioning, maintenance, and inspection. It also identifies installation preparation, construction requirements, installation procedures, quality inspection, and final acceptance as important parts of the overall process.
This guide reorganizes those technical topics into a practical reference for elevator technicians, installation contractors, maintenance companies, engineers, and building project managers.
1. What Does Elevator Installation Include?
A complete elevator installation normally involves several interconnected systems.
The source material describes the main elevator systems as including:
- Traction system
- Guide system
- Door system
- Elevator car
- Weight balancing system
- Electrical drive system
- Electrical control system
- Safety protection system
These systems cannot be installed independently.
For example:
The guide rail installation affects car movement.
The door installation affects door operation and door lock engagement.
The traction system affects elevator movement.
The electrical control system coordinates the operation of the elevator.
The safety system monitors abnormal conditions and provides protective action.
Therefore, elevator installation should be treated as an integrated engineering process rather than a collection of unrelated installation tasks.
2. Elevator Installation Preparation
Before installation begins, the construction site should be checked carefully.
The source material divides the installation environment into several important areas:
- Machine room
- Elevator shaft
- Pit
- Landing areas
- Landing doors
- Electrical supply
- Building access and working environment
The building should provide an appropriate working environment for the elevator equipment before installation starts.
A practical preparation checklist should include:
Building Conditions
- Elevator shaft completed
- Machine room completed where applicable
- Pit completed
- Landing openings prepared
- Structural supports available
- Required access available
Electrical Conditions
- Appropriate power supply available
- Electrical distribution prepared
- Grounding system available
- Temporary construction power separated from permanent elevator power where required
Working Environment
- Installation area clean
- Adequate lighting
- Safe access
- Material storage area
- Lifting equipment
- Required installation tools
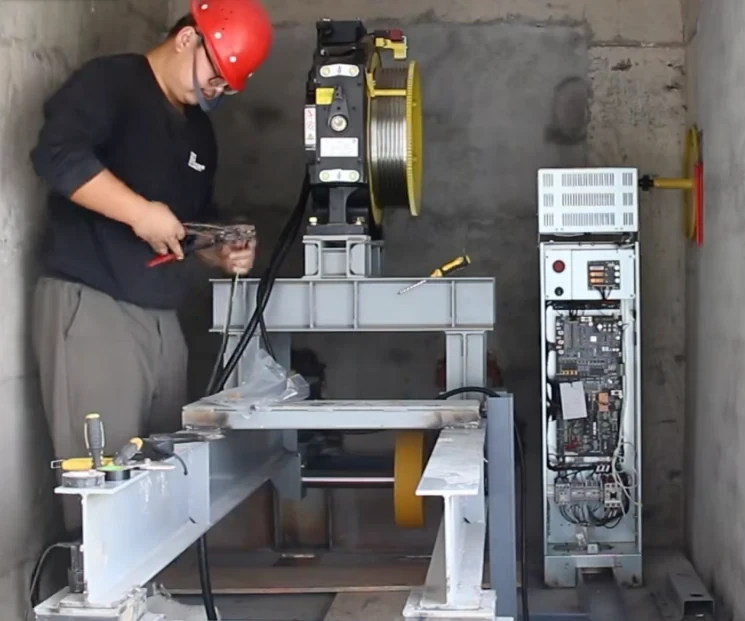
3. Elevator Machine Room Requirements
For a traditional machine-room elevator, the machine room provides space for major equipment such as:
- Traction machine
- Control cabinet
- Electrical equipment
- Related mechanical equipment
- Service and maintenance access
The source material specifies requirements relating to machine-room environmental conditions, floor strength, ventilation, lighting, access, electrical supply, and equipment arrangement.
The machine room should therefore be checked before equipment installation.
Important Inspection Items
Floor Strength
The floor must be capable of supporting the loads associated with the elevator equipment.
Ventilation
The machine room should have appropriate ventilation to prevent excessive heat accumulation.
Lighting
Adequate fixed lighting should be provided so technicians can safely inspect and maintain equipment.
Access
The machine room should have safe and practical access for installation and future maintenance.
Equipment Arrangement
The traction machine, control cabinet and other equipment should be positioned according to the elevator design and manufacturer's installation requirements.
4. Elevator Shaft Requirements
The elevator shaft is one of the most important parts of the installation environment.
The source material describes requirements related to:
- Shaft structure
- Shaft enclosure
- Landing openings
- Inspection access
- Ventilation openings
- Shaft lighting
- Guide rail supports
- Protection between multiple elevators
- Dedicated elevator shaft space
The shaft should be inspected before elevator equipment is installed.
Check the Shaft Structure
The shaft must have sufficient structural strength for the planned elevator installation.
Check Guide Rail Supports
Guide rail brackets must have appropriate structural support.
Check Landing Openings
Landing openings must correspond to the elevator design and landing door arrangement.
Check Shaft Cleanliness
The shaft should be free of unnecessary construction materials and debris before installation.
Check Shaft Lighting
The source material calls for permanent shaft lighting, with lighting provisions at appropriate high and low points and intermediate locations.
5. Elevator Pit Preparation
The elevator pit is another critical area that must be completed before installation.
The source material identifies several pit-related requirements, including:
- Pit structure
- Drainage provisions
- Waterproofing
- Pit floor condition
- Buffer installation area
- Safety space
- Pit stop switch
Before installation, technicians should verify:
- Pit is clean
- Pit floor is completed
- Water accumulation is prevented
- Drainage provisions are available where required
- Required safety space is available
- Buffer mounting location is prepared
- Pit safety devices can be installed correctly
A clean and properly prepared pit makes subsequent installation and inspection much easier.
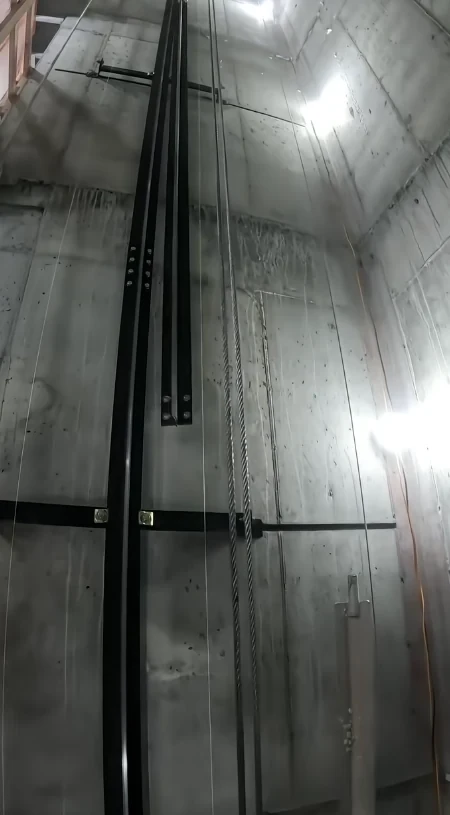
6. Elevator Guide Rail Installation
The guide rail system controls the movement of the elevator car and counterweight.
The source material identifies guide rails and guide rail brackets as an important part of the installation process and specifies checks relating to alignment, brackets, joints, fastening and installation position.
During installation, technicians should pay attention to:
- Guide rail type
- Guide rail position
- Bracket installation
- Vertical alignment
- Rail joints
- Fastener condition
- Relative position between car and counterweight guide rails
Improper guide rail installation can contribute to:
- Car vibration
- Abnormal noise
- Uneven running
- Guide shoe wear
- Poor ride comfort
This is why guide rail installation should be carefully measured and documented.
7. Traction System Installation
The traction system is responsible for transferring the driving force required to move the elevator car.
The source material identifies the main traction-related components as including:
- Traction machine
- Wire rope
- Guide wheels
- Sheaves
- Related mechanical components
During installation, technicians should inspect:
Traction Machine
Verify:
- Correct model
- Correct installation position
- Proper mounting
- Manufacturer documentation
- Brake condition
Wire Rope
Check:
- Correct specification
- Correct routing
- Clean condition
- Proper connection
- No abnormal damage
Sheaves and Guide Wheels
Verify:
- Correct alignment
- Secure mounting
- Smooth rotation
- Appropriate rope contact
The source material also emphasizes checks on rope tension and traction-related components during installation inspection.
8. Elevator Car Installation
The elevator car is the passenger or load-carrying part of the system.
The source material describes the car as consisting of a car frame and car body, with components such as the car floor, walls, ceiling, lighting, decorative components and operating buttons.
During installation, technicians should inspect:
- Car frame
- Car platform
- Car enclosure
- Car door
- COP
- Lighting
- Operating buttons
- Safety equipment
- Guide shoe connections
The car should be correctly aligned with the guide rails and landing entrances.
9. Counterweight Installation
The counterweight system is used to balance the elevator car and part of its rated load.
The source material identifies the counterweight system as consisting of the counterweight frame and counterweight blocks, together with the relevant compensation arrangement.
During installation, verify:
- Counterweight frame
- Counterweight blocks
- Guide shoes
- Guide rails
- Fasteners
- Rope connection
- Protection components
The counterweight must move smoothly and maintain the required relationship with the car and guide system.
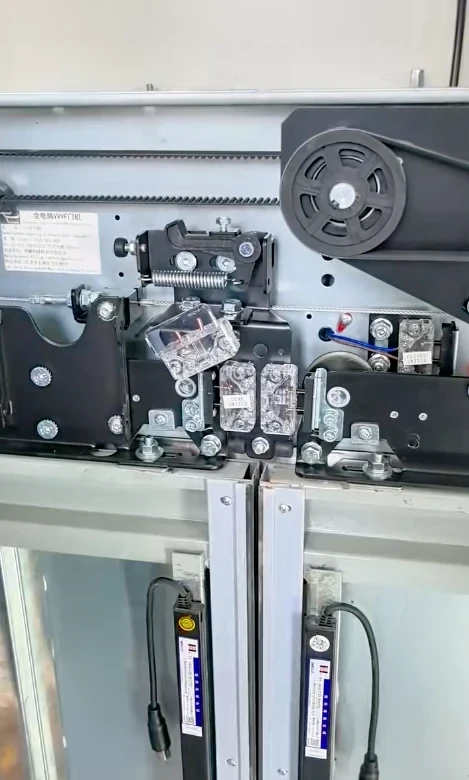
10. Elevator Door Installation
The elevator door system includes components such as:
- Car door
- Landing door
- Door operator
- Door rollers
- Door guide components
- Door lock
- Door sill
The source material includes dedicated installation checks for the car, landing doors, door sills, door panels, door locks and related components.
During installation, check:
Door Panel
The door panel should move smoothly without abnormal mechanical resistance.
Door Sill
The sill should be correctly positioned and securely installed.
Door Roller and Guide
The door mechanism should operate smoothly.
Door Lock
The landing door lock must be correctly installed and integrated with the safety circuit.
Door Alignment
The landing door and car door should maintain the required relationship throughout the opening and closing cycle.
11. Electrical System Installation
The electrical installation is an essential part of elevator commissioning.
The source material covers:
- Power supply
- Control cabinet
- Electrical wiring
- Traveling cable
- Grounding
- Electrical insulation
- Control circuits
- Safety circuits
- Electrical protection
During electrical installation, technicians should verify:
Power Supply
The elevator power supply should match the equipment requirements.
Control Cabinet
The control cabinet should be correctly installed and accessible for maintenance.
Wiring
Wiring should be:
- Correctly identified
- Properly secured
- Protected from mechanical damage
- Routed according to the design
- Free from unnecessary tension
Grounding
The grounding system should be completed and tested according to the applicable requirements.
Traveling Cable
The traveling cable should be correctly supported and arranged to prevent interference or mechanical damage during elevator operation.
12. Elevator Safety Device Installation
Elevator safety devices are an essential part of the installation.
The source material identifies safety-related components and checks including:
- Overspeed governor
- Safety gear
- Buffer
- Door interlock
- Limit switches
- Emergency stop switches
- Safety circuits
Safety devices should not be treated as optional accessories.
They must be installed correctly and verified before the elevator enters normal operation.
13. Elevator Installation Quality Inspection
After installation, the elevator should undergo a systematic quality inspection.
A useful inspection sequence is:
Step 1 — Machine Room
Check:
- Equipment mounting
- Control cabinet
- Electrical wiring
- Grounding
- Lighting
- Ventilation
- Access
Step 2 — Shaft
Check:
- Guide rails
- Brackets
- Traveling cable
- Shaft lighting
- Landing openings
- Shaft cleanliness
Step 3 — Car
Check:
- Car frame
- Car platform
- COP
- Door
- Guide shoes
- Safety equipment
Step 4 — Counterweight
Check:
- Counterweight frame
- Blocks
- Guide shoes
- Rope connection
- Protection
Step 5 — Landing Doors
Check:
- Door panels
- Sills
- Door rollers
- Door lock
- Door alignment
- Call buttons
- Indicators
Step 6 — Pit
Check:
- Buffer
- Pit stop switch
- Safety space
- Drainage
- Cleanliness
14. Elevator Pre-Commissioning Inspection
Before running the elevator, a complete inspection should be completed.
The source material specifically describes pre-operation inspection involving installation quality, insulation resistance, grounding, lubrication, electrical equipment, power supply and mechanical equipment.
A practical pre-commissioning checklist includes:
- Installation inspection completed
- Electrical connections checked
- Grounding checked
- Insulation testing completed where applicable
- Safety circuits checked
- Door locks checked
- Brake checked
- Guide rails checked
- Traction system checked
- Lubrication completed
- Emergency devices checked
Only after the required inspections have been completed should the elevator proceed to commissioning.
15. Elevator Test Run
The source material includes several types of testing during commissioning.
These include checks related to:
- Elevator starting
- Running
- Stopping
- Control functions
- Leveling
- Brake operation
- Safety gear
- Overspeed governor
- Buffer
- Door interlock
- Limit switches
- Safety switches
- Continuous operation
- Overload testing
The exact test procedure and acceptance criteria must follow the applicable code and elevator manufacturer's documentation.
16. Elevator Load Testing
Load testing is part of the overall commissioning and inspection process described in the source material.
The document discusses testing under different loading conditions and includes full-load, partial-load, and overload-related tests.
The purpose of load testing is to verify that the elevator can:
- Start correctly
- Run correctly
- Stop correctly
- Maintain required control
- Operate safety devices correctly
- Maintain acceptable leveling performance
Load testing must be performed using an approved procedure and appropriate test equipment.
17. Elevator Safety Testing
Safety testing is one of the most important parts of elevator commissioning.
The source material includes testing of:
Overspeed Governor and Safety Gear
The system should respond correctly to the applicable test condition.
Buffer
The buffer should be inspected and tested according to its design and applicable requirements.
Door Interlock
The elevator should not operate normally when a required landing door interlock condition is not satisfied.
Limit Switches
The relevant limit protection should operate correctly.
Emergency Stop Devices
Emergency stop functions should cause the required protective action.
18. Elevator Installation Documentation
Good documentation is an important part of installation quality.
The source material lists technical and inspection documentation such as:
- Product certificates
- Traction machine documentation
- Guide wheel and overspeed governor inspection records
- Guide rail inspection records
- Car and landing door inspection records
- Control cabinet and wiring inspection records
- Safety device records
- Cable and grounding records
- Test reports
- Self-inspection records
- Quality inspection records
A complete installation project should therefore maintain an organized technical file.
19. Elevator Installation Checklist
Machine Room
- Machine room completed
- Traction machine installed
- Control cabinet installed
- Electrical supply available
- Grounding completed
- Lighting available
- Ventilation available
- Access available
Elevator Shaft
- Shaft structure completed
- Guide rail supports installed
- Guide rails installed
- Shaft lighting installed
- Landing openings correct
- Shaft clean
Pit
- Pit completed
- Drainage condition checked
- Buffer installation prepared
- Pit safety devices installed
- Pit clean
Car
- Car frame installed
- Car platform installed
- Car door installed
- COP installed
- Lift buttons installed
- Guide shoes checked
Landing
- Landing doors installed
- Door sills installed
- Door locks installed
- Call buttons installed
- Indicators installed
Electrical
- Control cabinet checked
- Wiring checked
- Traveling cable checked
- Grounding checked
- Insulation checked
- Safety circuit checked
Final Testing
- No-load test
- Load test
- Door operation test
- Safety device test
- Leveling test
- Limit switch test
- Emergency stop test
- Final performance test
20. Common Elevator Installation Problems
Several installation problems can lead to later maintenance issues.
Poor Guide Rail Alignment
Possible consequences:
- Vibration
- Noise
- Guide shoe wear
- Poor ride quality
Incorrect Door Adjustment
Possible consequences:
- Door reopening
- Door lock problems
- Door closing faults
- Abnormal door noise
The source material emphasizes checking door installation, door sills, door locks, rollers and related clearances.
Poor Electrical Wiring
Possible consequences:
- Intermittent faults
- Communication problems
- Safety circuit faults
- Controller errors
Incomplete Safety Testing
This can leave dangerous conditions undetected.
Safety devices should therefore be tested rather than simply visually inspected.
21. Elevator Installation and Spare Parts
Correct installation also depends on using the correct components.
Typical installation-related elevator spare parts include:
- Guide rails
- Guide shoes
- Door locks
- Door rollers
- Door stoppers
- Door operator components
- Lift buttons
- Control boards
- I/O boards
- Safety switches
- Sensors
- Electrical components
This creates a natural connection between elevator installation and elevator spare parts sourcing.
For example:
Guide Rail Installation
→ Guide Shoe
Door Installation
→ Elevator Door Lock / Door Roller / Door Stopper
Control System Installation
→ Elevator PCB / Control Board
Electrical Commissioning
→ Elevator Testing Tools
22. How to Improve Elevator Installation Quality
The source material emphasizes the importance of installation quality, commissioning, inspection and maintenance as interconnected stages of elevator reliability.
A practical quality strategy is:
1. Prepare the Site
Do not begin equipment installation before the machine room, shaft and pit are ready.
2. Verify Components
Check product models, specifications and documentation before installation.
3. Measure During Installation
Do not wait until final commissioning to discover alignment problems.
4. Record Installation Results
Maintain inspection and measurement records.
5. Test Safety Devices
Safety functions should be tested according to the approved procedure.
6. Complete Commissioning
Run the elevator under the required operating conditions.
7. Complete Documentation
Keep installation, inspection and test records for handover and future maintenance.
23. Elevator Installation vs. Elevator Maintenance
Installation is only the beginning of the elevator life cycle.
The source material explicitly connects installation quality with later elevator maintenance and reliability.
A poorly installed component may create repeated maintenance problems later.
For example:
Poor guide rail alignment
→ vibration
→ guide shoe wear
→ repeated maintenance
Poor door adjustment
→ door faults
→ door lock problems
→ elevator downtime
Poor electrical installation
→ intermittent faults
→ controller errors
→ difficult troubleshooting
This is why installation quality should be considered a form of preventive maintenance.
Frequently Asked Questions
What are the main stages of elevator installation?
The main stages include site preparation, machine room and shaft preparation, traction system installation, guide rail installation, car and counterweight installation, door installation, electrical installation, safety device installation, commissioning, testing and final inspection.
What should be checked before elevator installation?
The machine room, shaft, pit, landing openings, electrical supply, structural supports, access conditions and working environment should be checked before installation begins.
Why are guide rails important during elevator installation?
Guide rails control the movement of the elevator car and counterweight. Their installation position, alignment, fastening and joints are important for smooth and reliable elevator operation.
What should be checked during elevator door installation?
Inspect the door panels, door sills, rollers, guide components, door operator, door lock, alignment and door operation.
What testing is required after elevator installation?
The source material describes testing related to operation, leveling, load conditions, safety gear, overspeed governor, buffers, door interlocks, limit switches, emergency safety functions and overall performance.
The exact tests and acceptance criteria should follow the applicable local requirements and manufacturer's procedures.
Why is documentation important after elevator installation?
Installation and commissioning records provide evidence of the work performed and can support final inspection, handover and future maintenance. The source material lists various installation inspection records, test records and technical documents that should be prepared.
Conclusion
A professional elevator installation requires much more than assembling the elevator components.
The machine room, shaft, pit and landing areas must first provide the appropriate installation conditions. The traction system, guide rails, car, counterweight, door system, electrical system and safety devices must then be installed and inspected as an integrated system.
After mechanical and electrical installation is complete, the elevator must undergo commissioning and the required testing. Installation records, inspection documents and test results should also be properly organized for handover and future maintenance.
The technical material used for this guide shows that elevator safety and reliability depend on the combined quality of manufacturing, installation, commissioning, inspection and maintenance.
For elevator installation contractors and maintenance companies, following a structured installation process can reduce future failures and make later troubleshooting easier.
At the same time, using the correct elevator spare parts, professional installation tools and appropriate elevator testing tools helps ensure that the completed elevator system can operate safely and reliably.
Important: This article is a technical reference based on the supplied material. It is not a substitute for the elevator manufacturer's installation manual, project specifications, applicable local building/elevator codes, or inspection authority requirements. Specific dimensions, clearances, test loads and acceptance criteria must be verified against the requirements applicable to the actual project.


