
WArning
The ETSL protection function is for elevators with short buffer distances.
Operating elevators with short buffer distances without this protection function may result in elevator damage, personal injury, or even death.
Ensure that the installed AC GSI main sensor has the necessary ETSL protection function.
Caution:
Electromagnetic sensitivity of the hoistway information system AC GSI
Bringing magnets close to the magnetic tape of the hoistway information system AC GSI can cause malfunctions and damage to the system.
Keep magnetic objects away from the magnetic tape of the hoistway information system AC GSI.
► Move the elevator car to a position where the OKR can be operated.
► AS: Set the following switches to OFF:
| JH | SIS | SIL |
► AS.SCPOW.BAT: Insert the BAT battery connector.
► AS.SCMAIN.LOP: Insert the LOP connector.
► OKR.SCCAR: Disconnect the temporary bypass connector for the safety circuit.
| Plug | Explanation |
| SISK | AC GSI - IMOF Plug |
| ETSL | Optional - ETLS function - IMOF Plug |
► OKR.SCCAR: Connector for inserting components:
| Plug | Explanation |
| SISK | Safety circuit – AC GSI |
| ETSL | Optional – ETLS function |
| SI | CAN bus – AC GSI |
►If AC GSI 10x/20x is present and the OKR.SCCAR.ETSL socket is available:
– OKR.SCCAR.ETSL: Ensure the provided ETSL jumper plug (ID 57817012) is inserted to complete the safety circuit.
The ETSL function is only required for AC GSI 3.
► CAR.AC GSI: Ensure the floor sensor on side 1 is connected.
► CAR.AC GSI: If the elevator car has two entrances, check the floor sensor connections.
► AS: Set the following switches to ON:
| JH | SIS | SIL |
► Wait for the startup sequence to complete and for the HMI to display the elevator status.
► Wait until the battery is fully charged.
- If the elevator's backup battery charge is below the minimum level, the elevator will not start the learning operation.
- After a period of time, the SCPOW LED BAT will remain constantly lit.
► HMI: Turn off weighing.
HMI: Commands → LM disable → Disable → OK.
► HMI: If "Install" is not displayed, revert to this state.
HMI: Commands → Special Trips → MOF → ON → OK.
► AS.SCPOW: Set JRH/JEM to INSPECTION.
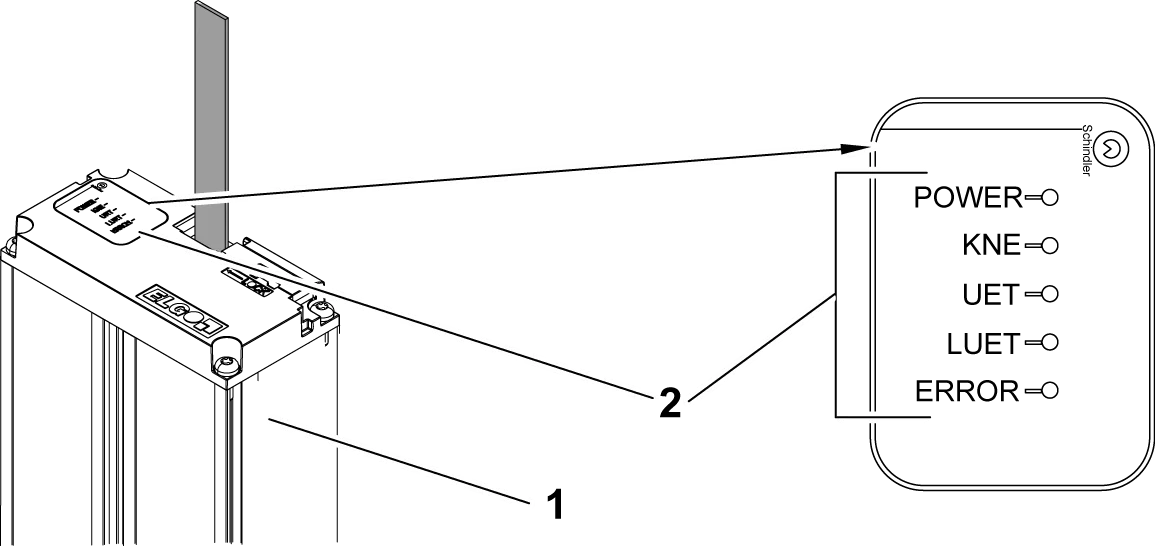
1 AC GSI 10x/20x 2 LED
► If AC GSI 10x/20x: Activate self-learning mode:
HMI: Commands → SITeachMode → ON → OK.
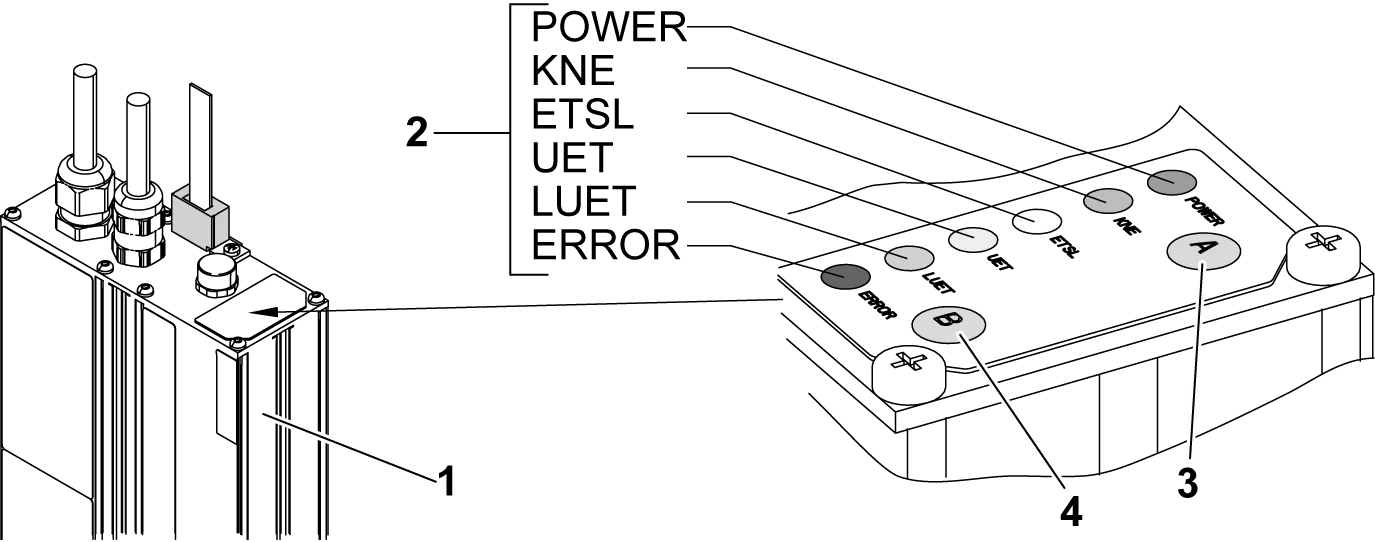
1 AC GSI 3 2 LED indicators
3 Button A 4 Button B
► If it's AC GSI 3: Activate the self-learning mode:
CAR.AC GSI: Press and hold these buttons simultaneously for more than two seconds.
| Button A | Button B |
► CAR.AC GSI: Monitoring the status of the LED:
| LED | State | Explanation |
| POWER (Green) | On | +24 VDC is connected. |
| KNE (yellow) | On | The KNE contact is disconnected correctly. |
| Flashing on | Pre-debugging | |
| Flashing off | Self-learning mode |
► Check and confirm that the KNE LED signal pattern has switched from pre-calibration mode to self-learning mode.

1 Pre-commissioning mode - KNE LED 2 Self-learning mode - KNE LED
The self-learning mode stops after 30 minutes.
► AS.HMI: Move the elevator car through the entire length of the hoistway so that the AC GSI can read all floor magnets, under the following conditions:
– Complete the self-learning procedure as shown in the diagram.
– Two optional self-learning procedures: (the direction of travel is not important)
• A: From the top floor to the bottom floor.
• B: From the bottom floor to the top floor.
– Move the elevator car up or down in the following manner:
• Downwards: Press DEM/DRH-E (SCMAIN) and DRH-D (HMI).
• Upwards: Press DEM/DRH-E (SCMAIN) and DRH-U (HMI).
► During the self-learning process, move the elevator car up and down until the counterweight or the car hits the buffer.
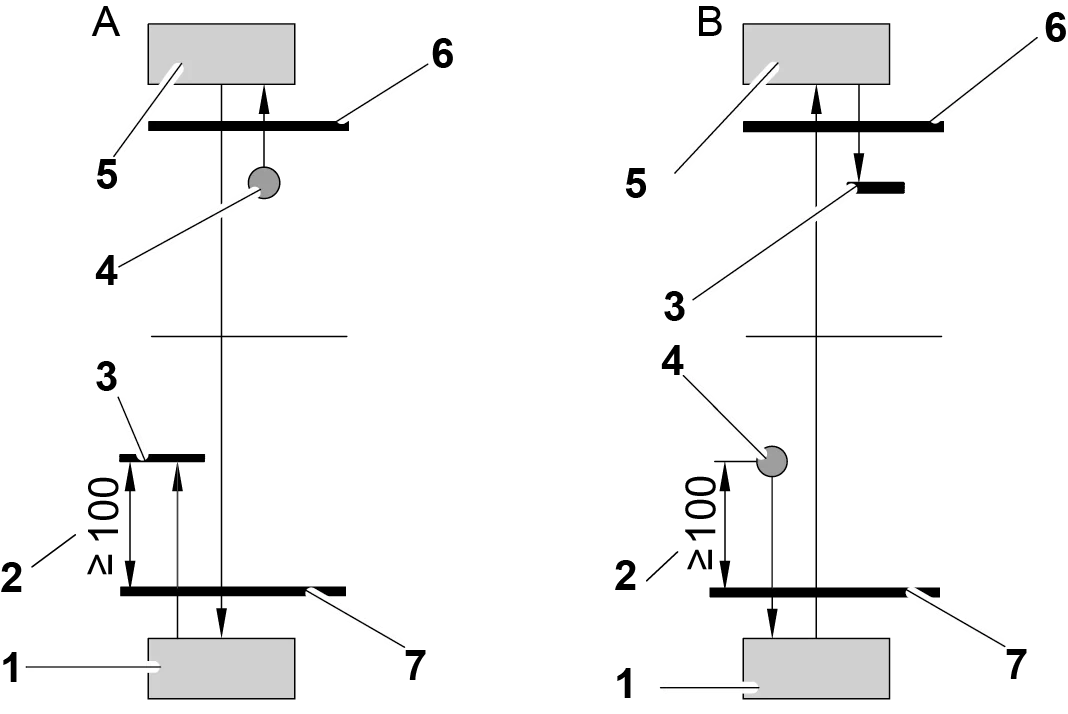
A Self-learning program from top floor to bottom floor B Self-learning program from bottom floor to top floor
1 Car buffer contact 2 Minimum activation distance
3 Self-learning program ends 4 Self-learning program starts
5 Counterweight buffer contact 6 Top floor
7 Bottom floor


